
So, you’re looking to start broadcasting to the World Wide Web, are you? However, you don’t know where to start or what to get to get started. That’s is A-Okay partner, I’ve got you covered. Today we will download, install and setup the most popular and go-to software for live broadcasting. Best part, it is free!
For those who don’t know what OBS, or Open Broadcast Software is: An open-source based software that serves as a tool to broadcast live to the internet.
Why OBS?
Before we get started, you should know there are other software available to live broadcast other than OBS. Both NVidia and AMD have software that pair with their GPUs to live stream to Twitch or YouTube respectively. Not quite as versatile, but they get the job done and give you just the right amount of options. You can look at X Split, which I also did a review on that you can find here. My only problem with X Split is that it became a resource hog on my machine, and I’ve heard and seen the same problem from others. Other than that, and you have to pay for access to majority of the functions, I decided to opt out of X Split. Wirecast is another piece of software that does live broadcasting to the internet. Wirecast is more of your high-end software suite. Gear more so for the professional level of broadcasting of events. Oh, you have to pay for that one too. OBS can also do a lot of what Wirecast can do, it will just require additional plugins. OBS is free, versatile and relatively easy to set up once you know what you are doing with it. Which is what I’ll help you with today.
Let’s get started
To get started you’ll have to visit the official OBS website and download the software. You can find your way there, here (Link to OBS site). There you will select your Operating System you wish to install OBS onto. For this walk through I am using Windows, but the settings transfer from OS to OS.
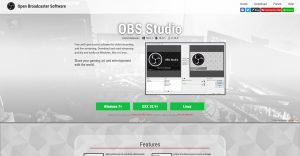 www.obsproject.com home page
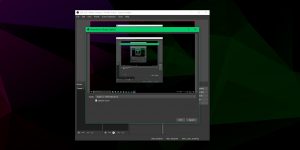
Once you have downloaded the OBS you will need to install it. Fair simple to install and nothing confusing inside of it. Choose where you want to install the OBS software. I have two hard drives on my computer so I installed OBS on my secondary hard drive, where I install most of my applications.
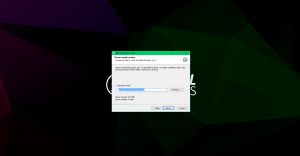
OBS Install Menus
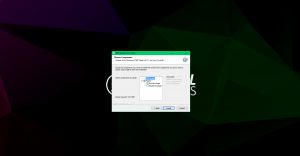
When installing OBS, the installer will ask if you want to install 2 additional pieces of software. A plugin called Browser Plugin, which is useful for incorporating web browser pages onto your stream. Requires a little more tinkering which is something we can talk about another time. You can also install a plugin called Realsense Plugin which works with Intel based cameras as far as I can tell. I personally didn’t install it because I am AMD hardware. You can install it if you run Intel, but I don’t know anything about it.
Once you’ve installed OBS you can now open the software and you will find your self with the main operating portion of the software. Majority of your time using OBS will be spent on this menu after configuring your stream settings. This is where you add your streams sources that get broadcast to the internet. We’ll come back to this in a minute.
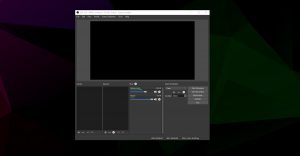
OBS Main Menu
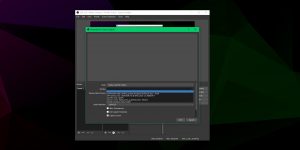
From here you will want to click on the “Settings” button found on the right-hand side, second last button, just above “Exit”. Once you’re in here you’ll first brought to the “General” tab of the settings menu. You won’t have to touch anything in here, and for the most part you can ignore this menu.
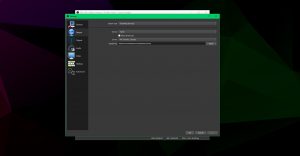
OBS Stream Menu
You’ll want to find your way to the left-hand side of the Settings Menu and select the “Stream” tab. In here is where you’ll find the settings for configuring your broadcast to places like Twitch or YouTube. You can even set it up to stream to your own server if you know how to set it up for handling live broadcasting. You’ll want to select the “Stream Type” drop down menu and select “Streaming services”. This will allow you choose streaming services from the drop-down menu below. For this guide, we’ll set up OBS to broadcast to Twitch. After that you can select which server of Twitch you would like to broadcast to. For this guide, I am choosing the closest server to me, which would be Toronto, Canada. Find the server closest to you and select it. After that you’ll need to obtain your “Stream Key” to broadcast to your Twitch account. You can find this in your Twitch Dashboard under “Settings” and click “Stream Key”. You’ll want to Copy & Paste that key into your “Stream Key” field back in OBS.
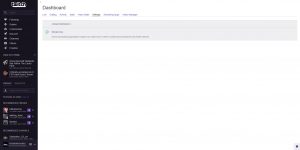
Twitch Stream Key Location
Once you’ve completed the “Stream” tab, you’ll want to go down one more to the “Output” tab to configure those settings. Here is where your setup for the following settings are found: “Output Mode”, “Video Bitrate”, “Encoder” and “Encoder Preset”. For streaming you’ll want to set your “Output Mode” to “Simple”. The “Advanced” setting gives you a couple more settings to play with, but not something that is crucial to getting a broadcast going.
From there you’ll want to set your “Video Bitrate”. This field reads in kb/ps. So, if you want to broadcast at 2 mb/ps you’ll want to enter “2000” as the value. Twitch caps out a broadcast at 3500 kb/ps. So, to determine what you should broadcast your “Video Bitrate” to be, is by first knowing what your “Upload” speed is from your ISP (Internet Service Provider). “2000” is a safe value to input for streaming if you have an upload speed of 5 mb/ps or higher. You can leave your “Audio Bitrate” at 160, don’t need to worry about this setting.
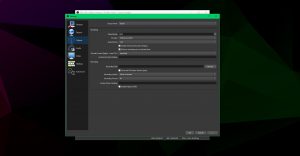
OBS Output Settings
Setting up the encoder is simple, just select “Software (x264)”. This chooses your CPU to process the stream before broadcasting online. From there we will set up the “Encoder Preset”. This setting determines how fast or how slow your CPU will process your stream before it is broadcasted online. The faster your CPU processes the content, the worse the quality will be on your stream. You’ll have video artifacts all over, and will be unviewable for your viewers. However, the slower your CPU processes the content, the harder and more resources your CPU works. The best way to configure this setting is to do some trial and error runs. Try each setting, watch your CPU in Task Manager, for “CPU Overload” in red text in the bottom left corner of OBS and watch for FPS drop in the bottom right of OBS.
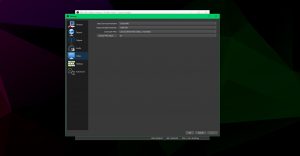
OBS Video Settings
Okay, so once you have configured your “Output” settings go to the “Video” tab on the left-hand menu. Here we will set up the “Base Canvas Resolution” as well as the “Output Scaled Resolution”. We will set the “Base Canvas Resolution” to 1920×1080. This will allow for an incorporated overlay or graphics to be based in 1080p resolution. We will set the “Output Scaled Resolution” to 1280×720. Change your Common FPS Values to 30 from 60. I’ve set it to that for less resource requirements on my PC. Once that’s done, hit “Ok”.
Once you’ve completed those two tasks we are done with the “Settings” of OBS. Congrats! You did it!
Now we will set up the canvas so you can broadcast a game or something creative like music production. Once we are complete with the settings, you’ll be back on the “Main Menu” of OBS. Under the Canvas you’ll see two columns that say “Scene” and “Sources”. We’ll need to create a new scene before we can add any sources to our OBS canvas. Click the “+” at the bottom of the “Scene” column, and a new scene will be created to be named. After that, click the “+” again but in the “Sources” column. This will bring up a sub menu to select from a variety of source types. For this we’ll set up both a Game and Display source. First choose “Display Capture”. Name the display capture, then select the display you wish to capture. If you only have one display, it’ll automatically choose it as well as the default monitor if you have multiple.
OBS Display Capture
Now you can broadcast online what you are doing on your desktop. If you are doing some graphic design, audio work, video editing or anything creative you can broadcast to the Creative section of Twitch where fellow creative people will come find you.
If you’re looking to set up a game to broadcast, all you need to do is add a “Game Capture” source to your scene. Just as with the display capture source, name the game capture source then you’ll get another menu to choose your game to broadcast. Change the “Mode” to “Capture Specific Window”. The menu will change settings to configure. Next, you’ll click the “Window” field and choose which window to capture. This is where you’ll select the game you wish to broadcast while playing. Once you’re done that, tick “Force Scaling” and select 1280×720. This will force the window to be captured in this resolution.
 OBS Game Capture
After that, you’ll just need to resize the sources within the actual canvas window. Select a source in the source column and use the red lines in the canvas to fill the canvas with the source.
YOU’RE DONE
That is, it! You’re done! Click “Start Stream” and you’re broadcasting live on Twitch! Nicely done!
TL; DR
- Download OBS (Link here)
- Install OBS
- Open OBS
- Going to Settings
- Go to Stream
- Change Stream Type to Streaming Services
- Select Twitch as service
- Select closest server
- Input Stream key from your Twitch dashboard -> settings
- Go to Output
- Change Output Mode to Simple
- Input 2000 for Video Bitrate
- Select Software (x264) as Encoder
- Tinker with Encoder Preset to find balance between CPU usage and stream quality
- Go to Video
- Change Base Canvas Resolution to 1920×1080
- Change Output Scaled Resolution to 1280×720
- Change FPS to 30
- Click OK
- Click “+” in Scenes to add a scene
- Click Display Capture
- Name the display capture
- Select which display to capture
- Click “+” again to add Game Capture
- Name the Game Capture
- Change mode to Capture Specific Window
- Choose a window to capture
- Force scaling to 1280×720
- Click OK
- Resize the sources to fill the canvas
- Click Start Streaming